
배치관리자 (Layout)
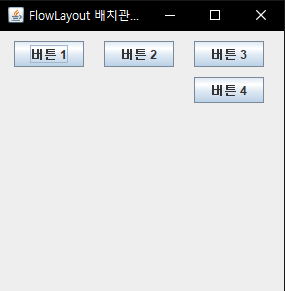
1. FlowLayout 배치관리자
- 좌 -> 우 형식으로 배치
- 상단 중앙에 컴포넌트를 배치함.
- 기본적으로 가운데 정렬됨.
- 화면이 넘칠 경우에는 바로 밑 중앙에 배치.
- 배치관리자를 지정하지 않았을 경우 FlowLayout이 기본적용됨.
|
1
2
3
4
5
6
7
8
9
10
11
12
13
14
15
16
17
18
19
20
21
22
23
24
25
26
27
28
29
30
31
32
33
34
35
36
37
38
39
|
package GUI;
import java.awt.FlowLayout;
import javax.swing.*;
public class GUI_FlowLayout extends JFrame {
public GUI_FlowLayout() {
setTitle("FlowLayout 배치관리자");
JPanel container = new JPanel();
//1.컴포넌트 만들기
JButton b1 = new JButton("버튼 1");
JButton b2 = new JButton("버튼 2");
JButton b3 = new JButton("버튼 3");
JButton b4 = new JButton("버튼 4");
//2.컨테이너에 컴포넌트 올리기
//new FlowLayout()
//new FlowLayout(정렬 - 왼쪽, 오른쪽, 중앙(default))
//new FlowLayout(정렬, 수평간격, 수직간격)
//*수평간격: 좌우 컴포넌트 사이의 간격. 픽셀단위 - 기본은 5px
container.setLayout(new FlowLayout(FlowLayout.RIGHT, 20, 10));
container.add(b1);container.add(b2);container.add(b3);container.add(b4);
//3.프레임에 컨테이너 올리기.
add(container);
setBounds(200, 200, 300, 300);
setDefaultCloseOperation(JFrame.EXIT_ON_CLOSE);
setVisible(true);
}
public static void main(String[] args) {
new Ex18_FlowLayout();
}
}
|
cs |
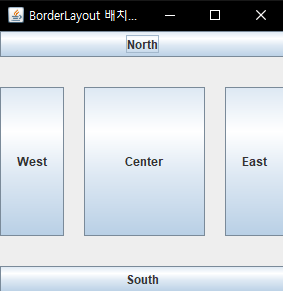
2. BorderLayout
-NORTH, CENTER, EAST, SOUTH, WEST 로 배치하는 관리자.
|
1
2
3
4
5
6
7
8
9
10
11
12
13
14
15
16
17
18
19
20
21
22
23
24
25
26
27
28
29
30
31
32
33
34
35
36
37
38
39
40
41
42
43
44
45
46
47
48
|
package GUI;
import java.awt.BorderLayout;
import javax.swing.*;
public class GUI_BorderLayout extends JFrame{
public GUI_BorderLayout() {
setTitle("BorderLayout 배치관리자");
JPanel container = new JPanel();
//1.컴포넌트 만들기
JButton button1 = new JButton("North");
JButton button2 = new JButton("South");
JButton button3 = new JButton("East");
JButton button4 = new JButton("West");
JButton button5 = new JButton("Center");
//2.컨테이너에 컴포넌트를 올리기
//new BorderLayout()
//new BorderLayout(수평간격, 수직간격)
//-수평간격: 좌우 컴포넌트 사이의 간격(픽셀단위) - 기본값은 0
//-수직간격: 상하 컴포넌트 사이의 간격(픽셀단위) - 기본값은 0
container.setLayout(new BorderLayout(20, 30));
container.add(button1, BorderLayout.NORTH);
container.add(button2, BorderLayout.SOUTH);
container.add(button3, BorderLayout.EAST);
container.add(button4, BorderLayout.WEST);
container.add(button5, BorderLayout.CENTER);
//3.프레임에 컨테이너 올리기
add(container);
setBounds(200, 200, 300, 300);
setDefaultCloseOperation(JFrame.EXIT_ON_CLOSE);
setVisible(true);
}
public static void main(String[] args) {
new GUI_BorderLayout();
}
}
|
cs |
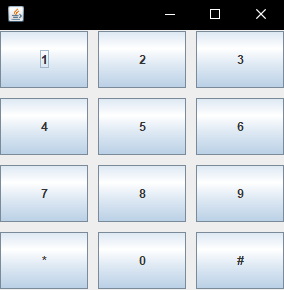
3. GridLayout
-그리드 형식으로 배치
-행과 열로 구성됨.
-무조건 행 기준.
|
1
2
3
4
5
6
7
8
9
10
11
12
13
14
15
16
17
18
19
20
21
22
23
24
25
26
27
28
29
30
31
32
33
34
35
36
37
38
39
40
41
42
43
44
45
46
47
|
package GUI;
import java.awt.GridLayout;
import javax.swing.*;
public class GUI_GridLayout extends JFrame {
public GUI_GridLayout() {
JPanel container = new JPanel();
//1.컴포넌트 생성.
JButton b1 = new JButton("1");
JButton b2 = new JButton("2");
JButton b3 = new JButton("3");
JButton b4 = new JButton("4");
JButton b5 = new JButton("5");
JButton b6 = new JButton("6");
JButton b7 = new JButton("7");
JButton b8 = new JButton("8");
JButton b9 = new JButton("9");
JButton b10 = new JButton("*");
JButton b11 = new JButton("0");
JButton b12 = new JButton("#");
//2.컨테이너에 컴포넌트 올리기.
//형식)
//new GridLayout(행, 열)
//new GridLayout(행, 열, 수평간격, 수직간격)
//수평, 수직: 좌우, 상하 픽셀단위 간격. 기본값은 역시 0
container.setLayout(new GridLayout(4, 3, 10, 10));
container.add(b1);container.add(b2);container.add(b3);
container.add(b4);container.add(b5);container.add(b6);
container.add(b7);container.add(b8);container.add(b9);
container.add(b10);container.add(b11);container.add(b12);
//3.프레임에 컨테이너 올리기.
add(container);
setBounds(200, 200, 300, 300);
setDefaultCloseOperation(JFrame.EXIT_ON_CLOSE);
setVisible(true);
}
public static void main(String[] args) {
new GUI_GridLayout();
}
}
|
cs |
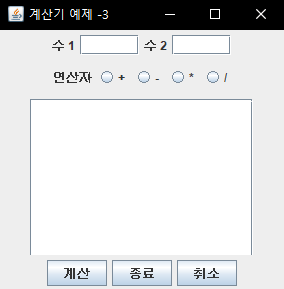
예제.
|
1
2
3
4
5
6
7
8
9
10
11
12
13
14
15
16
17
18
19
20
21
22
23
24
25
26
27
28
29
30
31
32
33
34
35
36
37
38
39
40
41
42
43
44
45
46
47
48
49
50
51
52
53
54
55
56
57
58
59
60
61
62
63
64
65
66
67
68
69
70
71
72
73
74
75
76
77
78
79
80
81
82
|
package GUI;
import java.awt.BorderLayout;
import javax.swing.*;
public class GUI_Layout03 extends JFrame {
public GUI_Layout03() {
setTitle("계산기 예제 -3");
JPanel container1 = new JPanel(); //상단
JPanel container2 = new JPanel(); //상단
JPanel container3 = new JPanel(); //중단
JPanel container4 = new JPanel(); //하단
//1.컴포넌트 만들기
//1-1 상단 컨테이너 컴포넌트1
JLabel su1 = new JLabel("수 1");
JTextField su1_box = new JTextField(5);
JLabel su2 = new JLabel("수 2");
JTextField su2_box = new JTextField(5);
//1-2 상단 컨테이너 컴포넌트2
JLabel op = new JLabel("연산자");
JRadioButton jrb1 = new JRadioButton("+");
JRadioButton jrb2 = new JRadioButton("-");
JRadioButton jrb3 = new JRadioButton("*");
JRadioButton jrb4 = new JRadioButton("/");
ButtonGroup bg = new ButtonGroup();
bg.add(jrb1); bg.add(jrb2); bg.add(jrb3); bg.add(jrb4);
//1-3 중앙 컨테이너 컴포넌트
JTextArea contents = new JTextArea(10, 20);
JScrollPane jsp = new JScrollPane(contents, ScrollPaneConstants.VERTICAL_SCROLLBAR_AS_NEEDED, ScrollPaneConstants.HORIZONTAL_SCROLLBAR_NEVER);
contents.setLineWrap(true); //줄바꿈메서드
//1-4 하단 컨테이너 컴포넌트
JButton result = new JButton("계산");
JButton exit= new JButton("종료");
JButton cancel = new JButton("취소");
//2-1 상단 컨테이너 구현
container1.add(su1); container1.add(su1_box); container1.add(su2); container1.add(su2_box);
container2.add(op);
container2.add(jrb1); container2.add(jrb2); container2.add(jrb3); container2.add(jrb4);
//2-2 중단 컨테이너
container3.add(jsp);
//2-3 하단 컨테이너
container4.add(result); container4.add(exit); container4.add(cancel);
//같은 구역 정렬시 가려지는 현상 해결하기.
//새 컨테이너 두개 생성.
//JPanel containerGroup1 = new JPanel(new BorderLayout());
JPanel containerGroup2 = new JPanel(new BorderLayout());
//새로운 컨테이너에 기존 컨테이너 올리기
//containerGroup1.add(container1, BorderLayout.NORTH);
containerGroup2.add(container2, BorderLayout.NORTH);
containerGroup2.add(container3, BorderLayout.CENTER);
containerGroup2.add(container4, BorderLayout.SOUTH);
//3. 프레임 설계
add(container1, BorderLayout.NORTH);
add(containerGroup2, BorderLayout.CENTER);
setDefaultCloseOperation(JFrame.EXIT_ON_CLOSE);
pack();
setBounds(200, 200, 300, 300);
setVisible(true);
}
public static void main(String[] args) {
new GUI_Layout03();
}
}
|
cs |
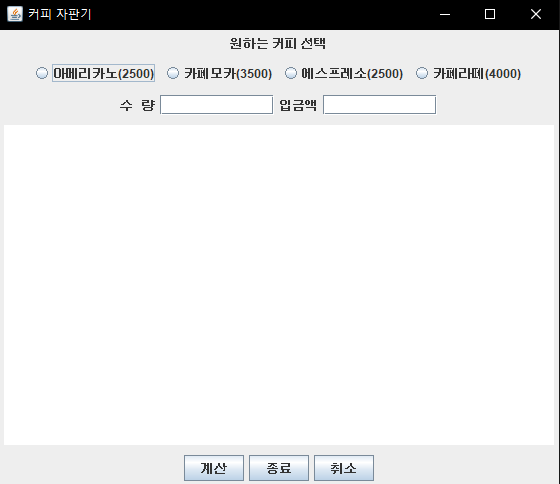
예제2
|
1
2
3
4
5
6
7
8
9
10
11
12
13
14
15
16
17
18
19
20
21
22
23
24
25
26
27
28
29
30
31
32
33
34
35
36
37
38
39
40
41
42
43
44
45
46
47
48
49
50
51
52
53
54
55
56
57
58
59
60
61
62
63
64
65
66
67
68
|
package exam;
import java.awt.BorderLayout;
import javax.swing.*;
public class Exam03 extends JFrame {
public Exam03() {
setTitle("커피 자판기");
//컨테이너 생성.
JPanel con1 = new JPanel();
JPanel con2 = new JPanel();
JPanel con3 = new JPanel();
JPanel con4 = new JPanel();
JPanel con5 = new JPanel();
//컨테이너 그룹화.
JPanel conGroup1 = new JPanel(new BorderLayout());
JPanel conGroup2 = new JPanel(new BorderLayout());
conGroup1.add(con1, BorderLayout.NORTH); conGroup1.add(con2, BorderLayout.CENTER);
conGroup2.add(con3, BorderLayout.NORTH); conGroup2.add(con4, BorderLayout.CENTER); conGroup2.add(con5, BorderLayout.SOUTH);
//컴포넌트 생성
//최상단
JLabel title = new JLabel("원하는 커피 선택");
//선택지
JRadioButton jb1 = new JRadioButton("아메리카노(2500)");
JRadioButton jb2 = new JRadioButton("카페모카(3500)");
JRadioButton jb3 = new JRadioButton("에스프레소(2500)");
JRadioButton jb4 = new JRadioButton("카페라떼(4000)");
ButtonGroup bg = new ButtonGroup();
bg.add(jb1); bg.add(jb2); bg.add(jb3); bg.add(jb4);
//수량, 입금액
JLabel count = new JLabel("수 량");
JTextField countBox = new JTextField(10);
JLabel money = new JLabel("입금액");
JTextField moneyBox = new JTextField(10);
//내용박스
JTextArea contents = new JTextArea(20, 50);
//최하단 버튼
JButton b1 = new JButton("계산");
JButton b2 = new JButton("종료");
JButton b3 = new JButton("취소");
//2. 컨테이너에 컴포들 배치
con1.add(title);
con2.add(jb1); con2.add(jb2); con2.add(jb3); con2.add(jb4);
con3.add(count); con3.add(countBox); con3.add(money); con3.add(moneyBox);
con4.add(contents);
con5.add(b1); con5.add(b2); con5.add(b3);
//3.프레임에 배치
add(conGroup1, BorderLayout.NORTH);
add(conGroup2, BorderLayout.CENTER);
setBounds(200, 200, 400, 400);
setDefaultCloseOperation(JFrame.EXIT_ON_CLOSE);
setVisible(true);
pack();
}
public static void main(String[] args) {
new Exam03();
}
}
|
cs |
'국기훈련과정 > JAVA 복습노트' 카테고리의 다른 글
| 13. GUI_다중 화면 예제 (0) | 2021.09.01 |
|---|---|
| 13. GUI_Event 예제 (0) | 2021.08.27 |
| 13. GUI_Event (0) | 2021.08.27 |
| 13. GUI_02 (0) | 2021.08.26 |
| 13. GUI_01 (0) | 2021.08.26 |